Avyaas Meet is powered by BigBlueButton, which is an open source web conferencing system for online learning. With web conferencing system, you get the core features you would expect from a commercial web conferencing system. These features include real-time sharing of audio, video, presentation, and screen – along with collaboration tools such as whiteboard, shared notes, polling, and breakout rooms. BigBlueButton can record your sessions for later playback.
BigBlueButton extends these core features to enable a teacher to engage students for learning. For example, a tutor can use BigBlueButton’s multi-user whiteboard to help a student with solving a difficult math problem. BigBlueButton has built-in integrations with all the major learning management systems (LMS), including Canvas, Jenzabar, Moodle, Sakai, and Schoology. It also supports Learning Tools Interoperability (LTI) 1.0 for integration with other LMS systems (such as Blackboard and D2L).
The site gives you all the details on how to configure, and customize BigBlueButton to your needs. We’ll start below with brief overview of how BigBlueButton works.
BigBlueButton overview
BigBlueButton is an HTML5-based web application. Unlike many commercial web conferencing systems that require you to install software, BigBlueButton runs within your web browser. You click a link (such as in Greenlight), your browser runs BigBlueButton and prompts you to join the audio bridge. There is no plugin to download, no software to install. BigBlueButton provides high-quality audio, video, and screen sharing using the browser’s built-in support for web real-time communication (WebRTC) libraries.
WebRTC is a standard supported by all major browsers, including Chrome, FireFox, Safari, and Safari Mobile. For best results on desktop and laptops, we recommend Chrome or Firefox. For Chromebooks, we recommend the built-in Chrome browser.
Support for WebRTC within the browser is rapidly growing. Microsoft recently (January 2020) released new version of Microsoft Edge that switched to use the Chromium engine the open source engine that powers Google Chrome. This means that soon that hundreds of millions of Windows 10 computers will be able to run BigBlueButton with a single click. Super cool.
Here is a screen shot of the BigBlueButton client running in Google Chrome.
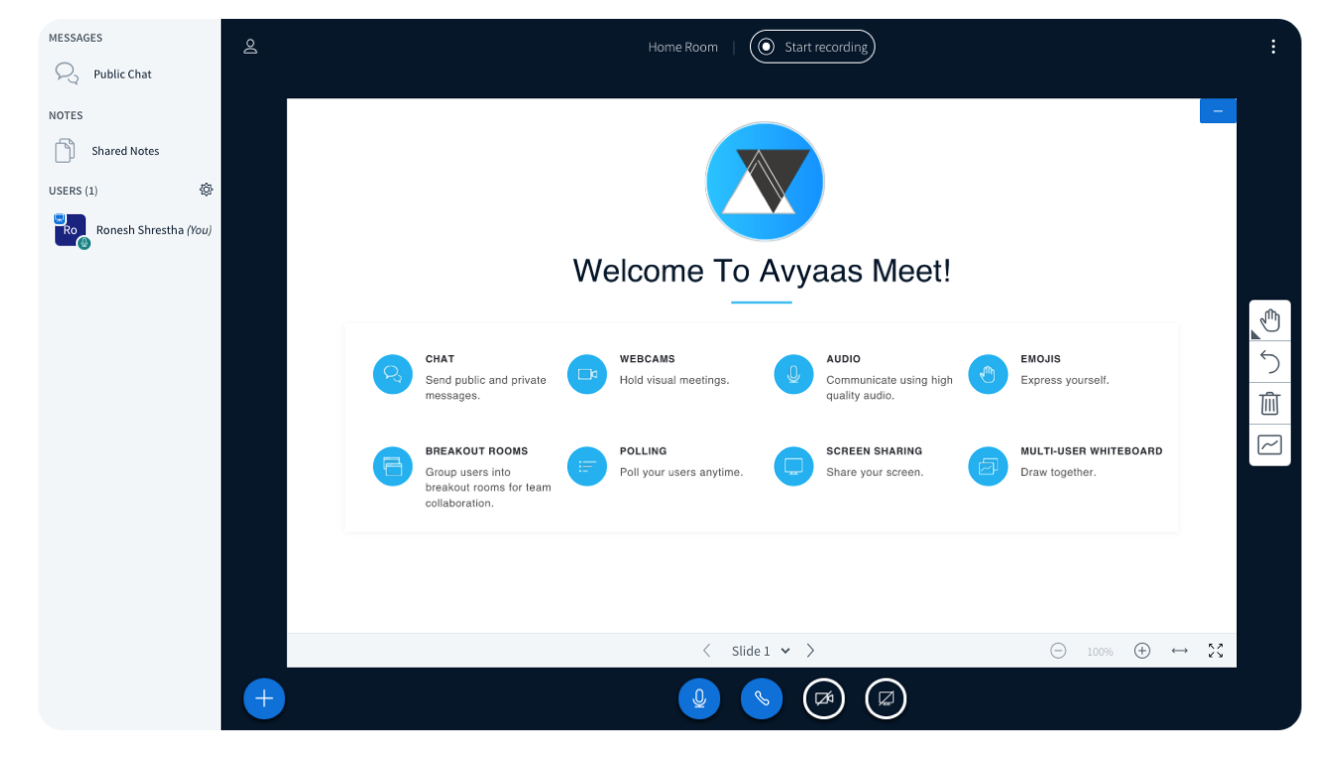
From left to right, you can see the list of users in the session, the chat area, the presentation area (where the current presenter can update), one shared web cam (you can share as many webcams as bandwidth allows), and the whiteboard tools.
Mobile support
BigBlueButton has a “mobile first” design. We designed the user interface (UI) to first run on a mobile device. Like the desktop, there is no mobile app to download or install. BigBlueButton runs within your mobile browser.
BigBlueButton runs on iOS version 12.2+ and Android version 6.0+. To join a session, you click a link within the browser or a mobile app (such as Moodle Mobile), and BigBlueButton will run within Safari Mobile (iOS) or Google Chrome (Android).
Here’s a screen shot of BigBlueButton running on an iOS phone in landscape mode.
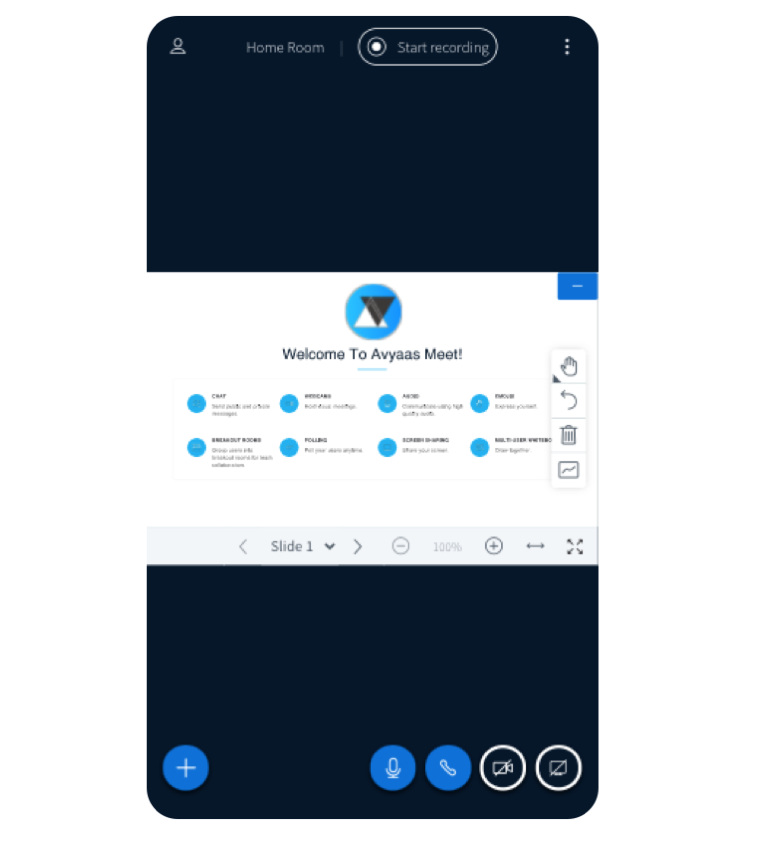
The only limitation on mobile platforms is the browsers do not support sharing of the mobile screen (though you can view another user’s screen share).
It’s worth emphasizing that the same HTML5 client runs across desktop, laptop, chromebook, iOS, and Android devices. This gives us a single code base to enhance, localize, and innovate without the multiple code bases.
Designed for online learning
We stated above that BigBlueButton extends many of its core features to focus on enabling the instructor to engage students. There are four main use cases for engagement:
- Tutoring/virtual office hours
- Flipped classroom
- Group collaboration
- Full online classes
If you are an instructor, BigBlueButton helps you engage students with:
- Multi-user whiteboard
- Break out rooms
- Chat (public and private)
- Polling
- Shared notes
- Emojis
We think of engagement as an activity that causes the user to recall (such as answering a poll), demonstrate (such as using multi-user whiteboard), apply (such as in breakout rooms), or ask questions (such as using public chat) about the material the instructor is trying to teach. The more students are engaged, the more they are thinking and learning.
Of course, all these features are still useful in a business meeting, video chat, or audio conference – but they are really useful when teaching users online.
Overview
There are two types of users in BigBlueButton: viewer and moderator.
- A viewer (typically the student) can chat, send/receive audio and video, respond to polls, display an emoji (such as their raised hand), and participate in a breakout sessions.
- A moderator (typically the instructor) can do everything a viewer can, plus more. A moderator can mute/unmute other viewers, lock down viewers (such as restrict them from using private chat), and make anyone the current presenter. There can be multiple moderators in a session.
The presenter can do the following:
- Upload slides
- Use the whiteboard to annotate any side
- Enable/disable multi-user whiteboard
- Start a poll
- Share a YouTube, vimeo, or Canvas Studio video
- Share their screen
There can be only one presenter at a time in the session. Any moderator can make any user presenter, including themselves.
Bigbluebutton has created two overview videos – one for the viewer and the other for the moderator – to show you how the above features work.
Use the presentation controls
A presenter in BigBlueButton has the ability to control and annotate content uploaded into the presentation area or the whiteboard.
The presenter role enables the user assigned the ability to:
- Control the slide navigation,
- Use the slide/whiteboard annotations, and
- Enable the multiuser whiteboard for use by attendees.
Control the slide navigation
By default, the first Moderator to enter the BigBlueButton session is allocated the presenter role capabilities; if you are a viewer you will need to request presenter status from the moderator.
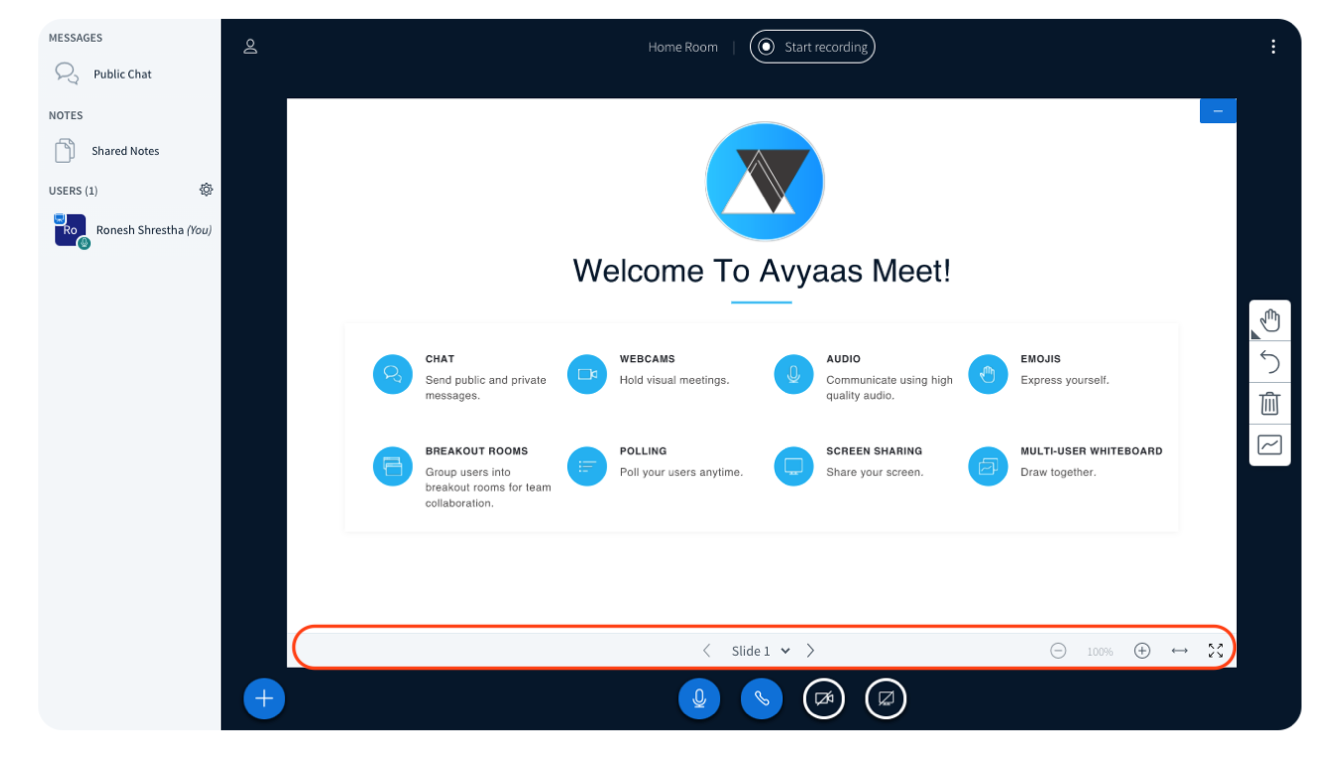

- To navigate through your content, use the Slide Navigator [1] located in the presenter control panel; advance using the forward ">" navigation arrows, return using the backwards "<" navigations arrows.
- Zoom In (+) or Out (-) [2], use Fit-to-Width [3], or engage Full Screen Mode [4].
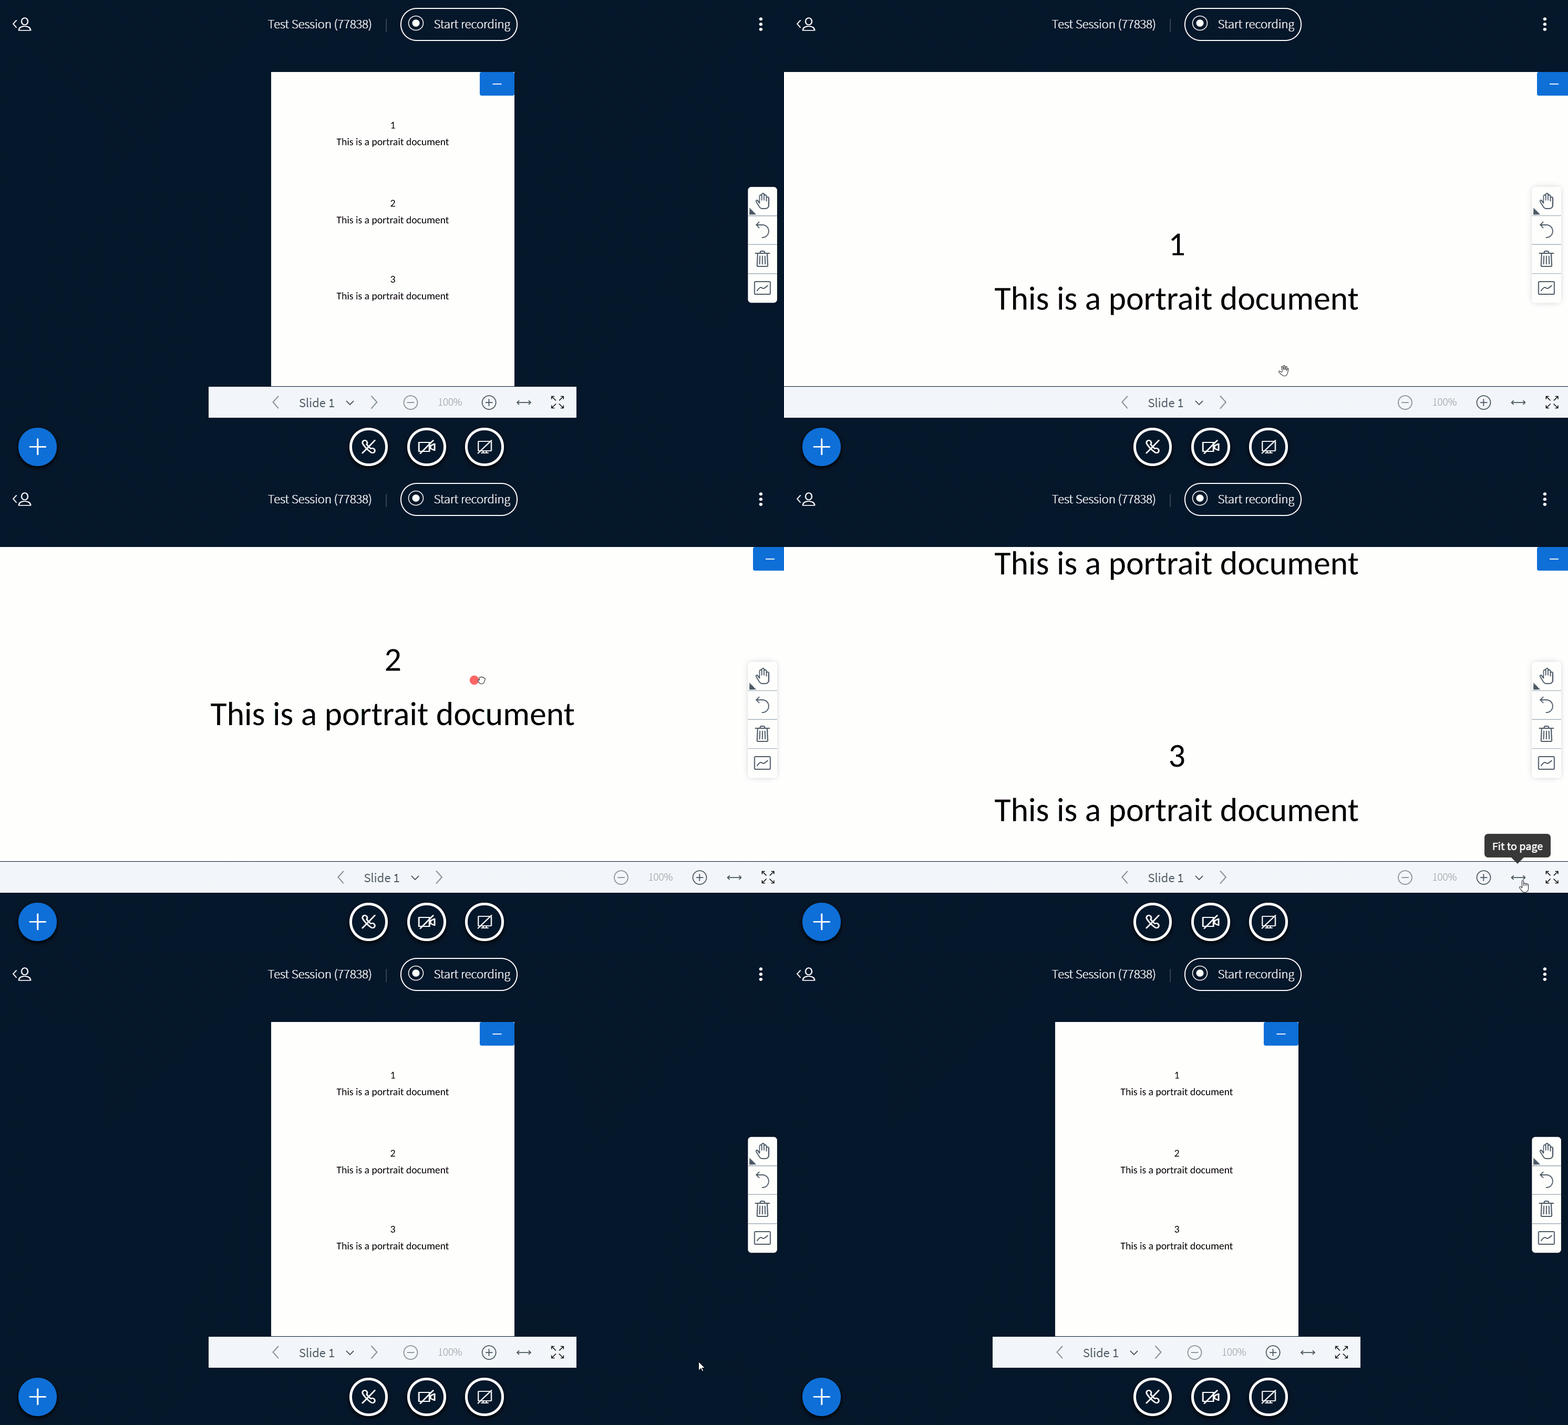
- When upload a portrait document, use Fit-to-Width to make the text larger. You can then click and drag with the hand tool to move up/down the document.
Slide/Whiteboard Annotations
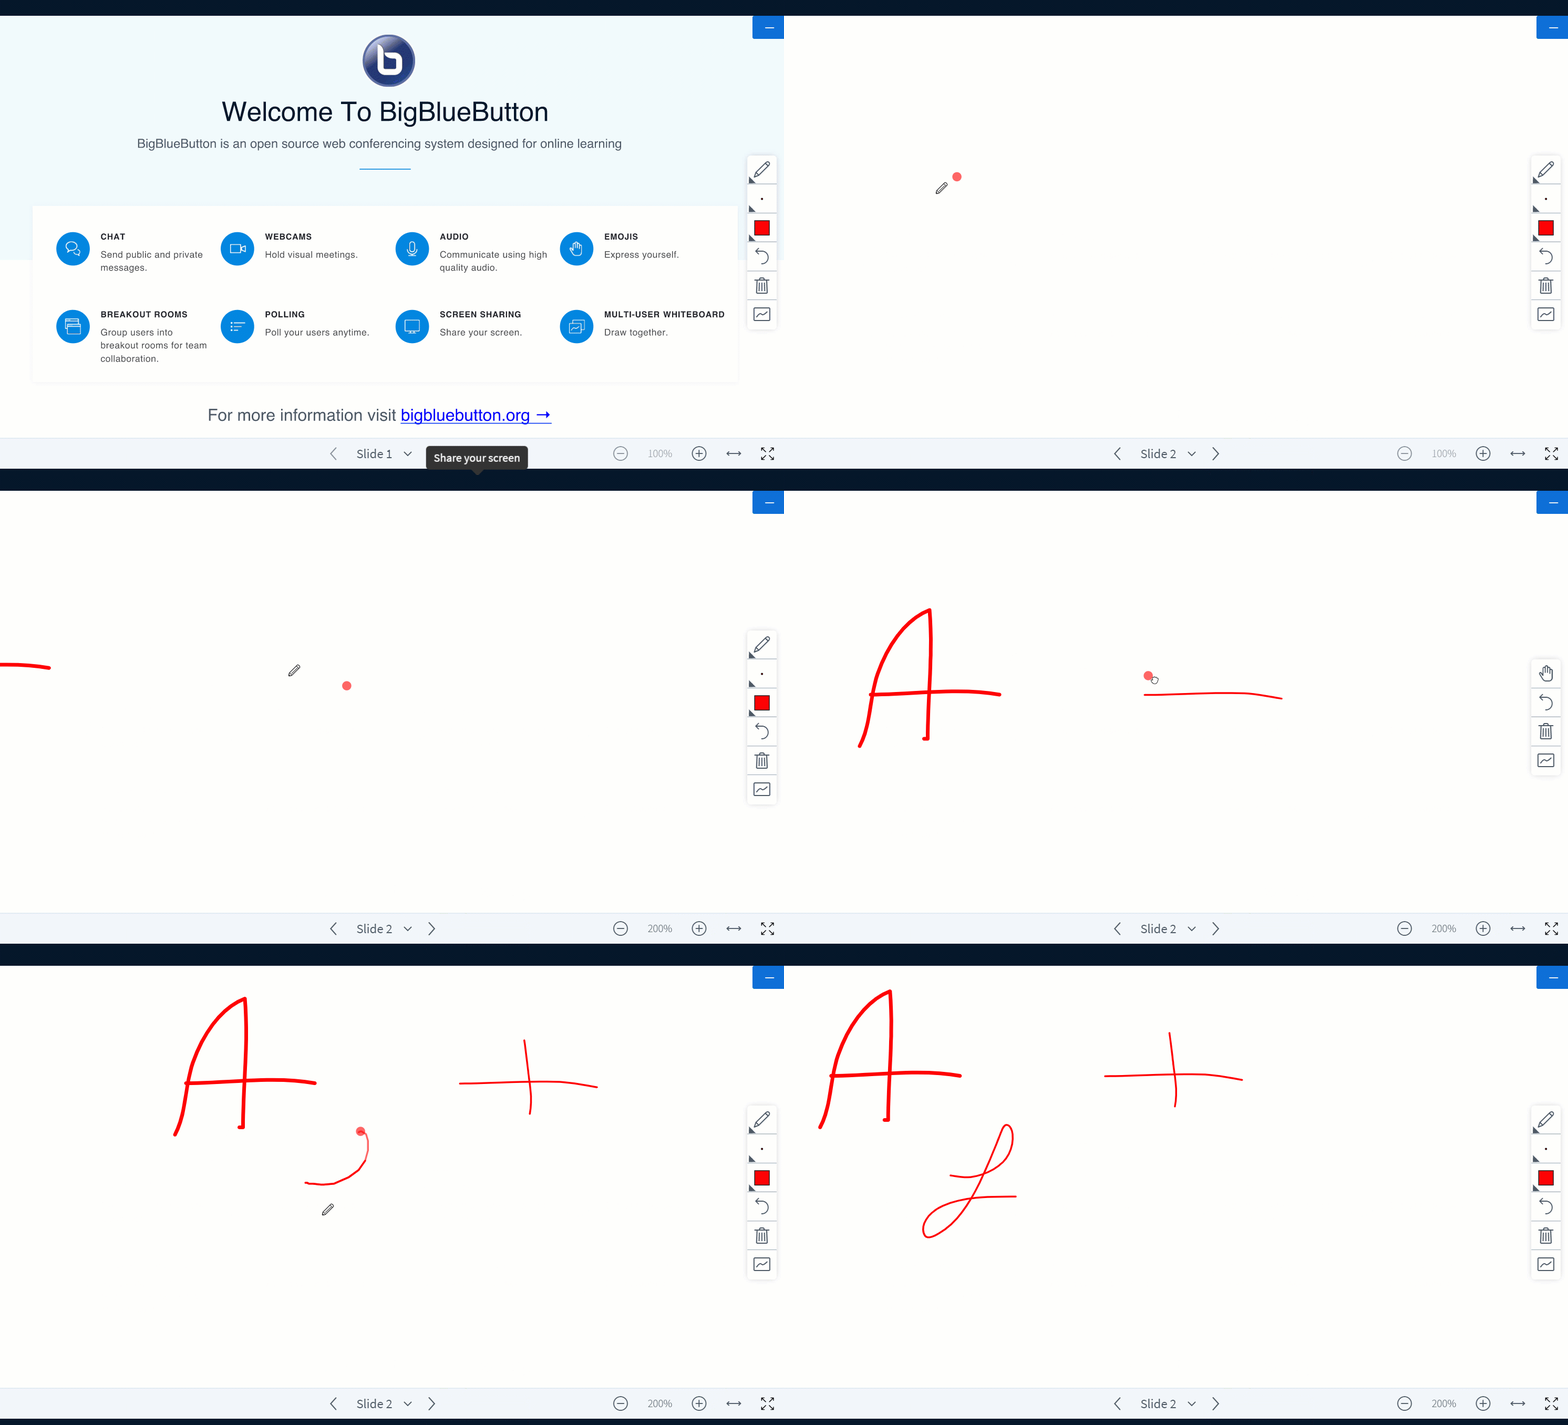
The presenter annotations are located to the right hand side of the presentation display in the BigBlueButton interface. By default the Pan tool is enabled.

To write on the presentation, select the Text Input [2] tool and draw a rectangle. The rectangle will be the text area.
To draw on the presentation select the Pencil Tool [7] and drag the mouse button to draw a line.
When the Pencil tool is enabled, additional menu options will appear that allow you to adjust the Line Thickness and change the Line Colour.
Annotations made to the white board can be removed by selecting Undo Most Recent or Undo All.
If you are using the pen tool and have zoomed into the presentation, you can hold down the SPACEBAR to pan around the presentation.
Enable Multi-User Whiteboard
The presenter can also enable the multi-user whiteboard; when activated, all users in the BigBlueButton session can annotate the whiteboard simultaneously.
The multi-user whiteboard must be enabled each slide or each time the presenter transitions from one slide to another.
Each user draws in their own separate layer -- their marks/clear events don’t affect other users.
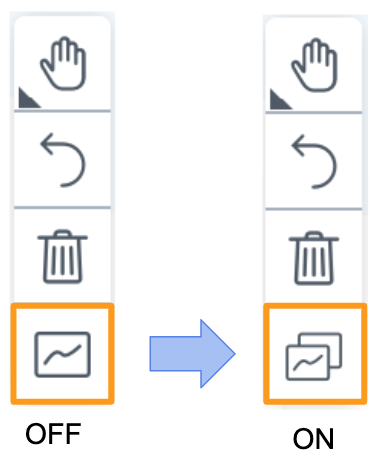
When enabled, the icon will change to indicate that the multi-user whiteboard is on/live.
Once multi-user whiteboard is turned off, the presenter can clear all whiteboard marks with the clear all annotations option.
Upload a Presentation
In order to upload documents and enable them for download you must first have the presenter role.
By default the first Moderator to enter the BigBlueButton session is allocated presenter role capabilities; if you are a viewer you will need to request presenter status from the moderator.
Each user draws in their own separate layer -- their marks/clear events don’t affect other users.
Next be sure your documents are within the size restrictions and are an accepted format.
Maximum size is 30 MB or 150 pages per document; you can upload multiple documents into the BigBlueButton as long as they are under the size restrictions.
BigBlueButton will accept many major document formats such as .doc .docx .pptx and .pdf; we recommend converting documents to .pdf prior to uploading for best results.
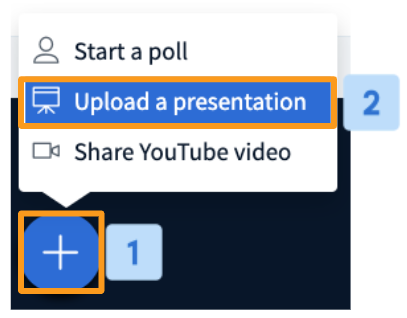
Select the Actions menu [1] in the lower left hand corner of the presentation window, then choose Upload a Presentation [2].
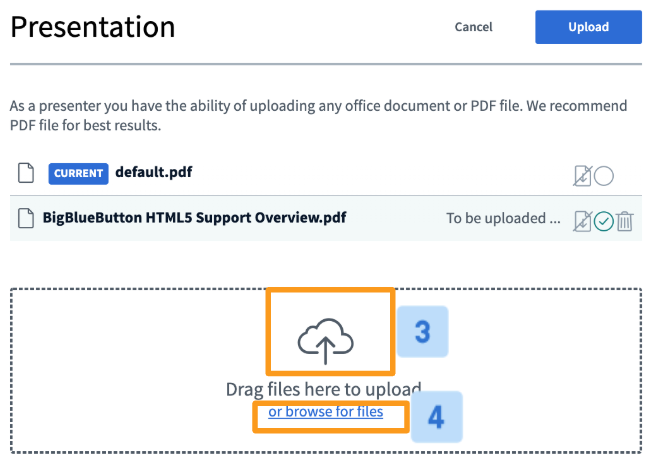
The BigBlueButton presentation uploader will appear. The uploader allows you to drag and drop [3] files into the uploader or browse for files [4] on your OS.
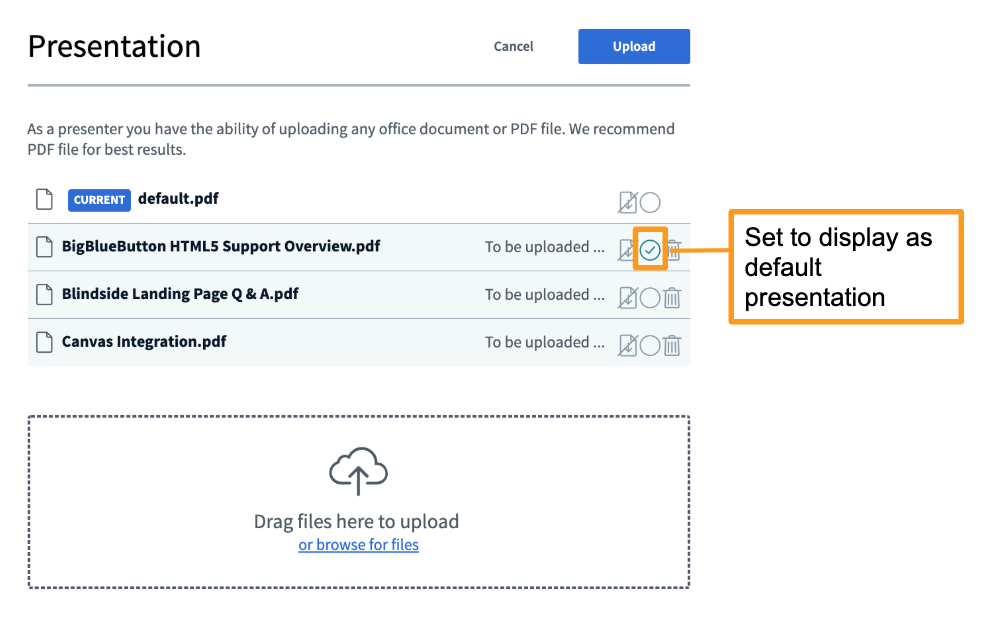
When uploading multiple files at once, be sure to set the file you'd like to be displayed by default, then check the green circle to the right of the document.
Enable Presentation Download
Any presenter uploading a document can enable it for download by viewers of the live conference at any time.
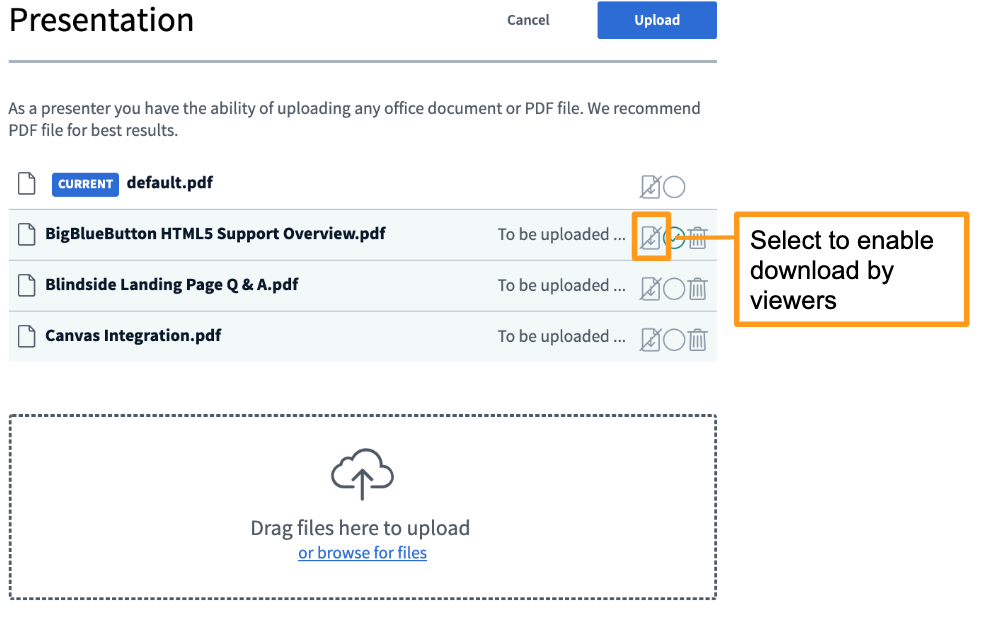
To enable, select the enable download icon located to the right of the document.
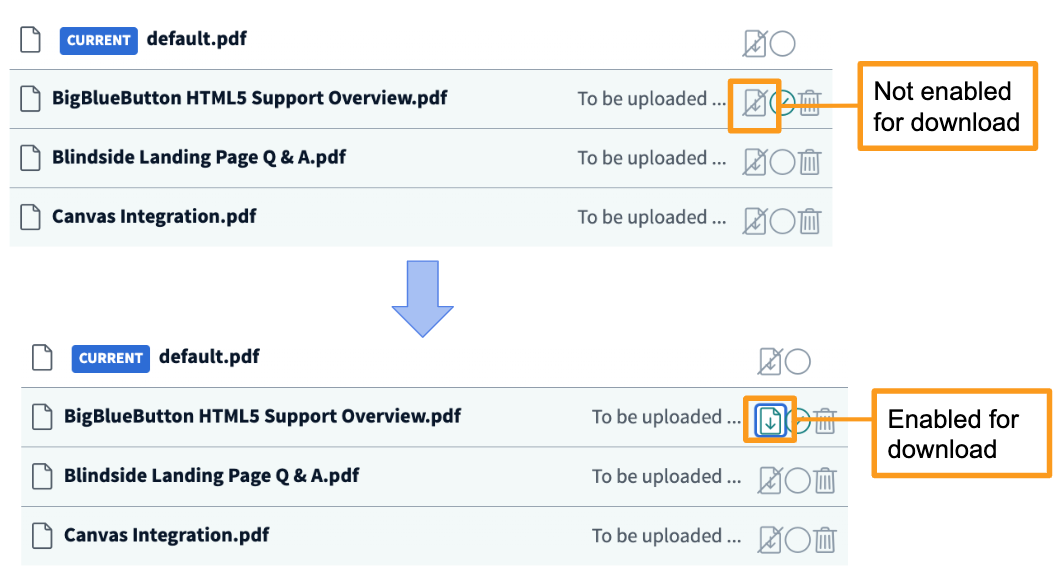
The icon will change to green to indicate the document selected can be downloaded by viewers.
What Viewers See
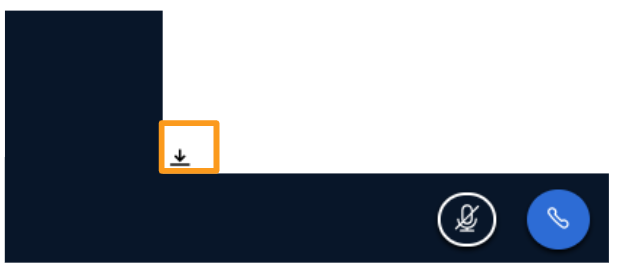
Viewers will be able to download the enabled documents via the file download icon in the bottom left of their screens.
Share an External Video Link
A presenter in BigBlueButton has the ability to share an external video with users in the live session.
The presenter role enables the assigned user the ability to share and control the video playback from an external video.
YouTube, Vimeo, Instructure Media, Twitch and Daily Motion URLs are supported links.
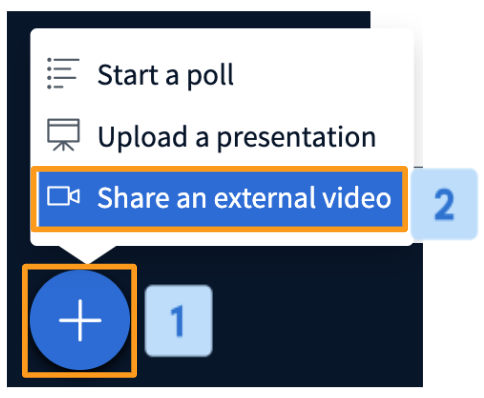
Select the Actions menu [1] in the lower left hand corner of the presentation window, then choose Share YouTube video [2].
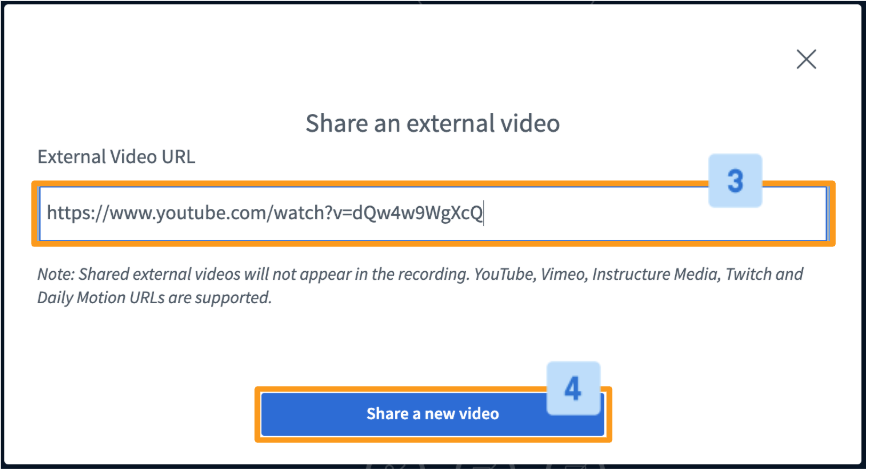
Copy and paste an unlisted or public YouTube link into the Video URL [3] field and select Share a new video [4] to begin sharing.
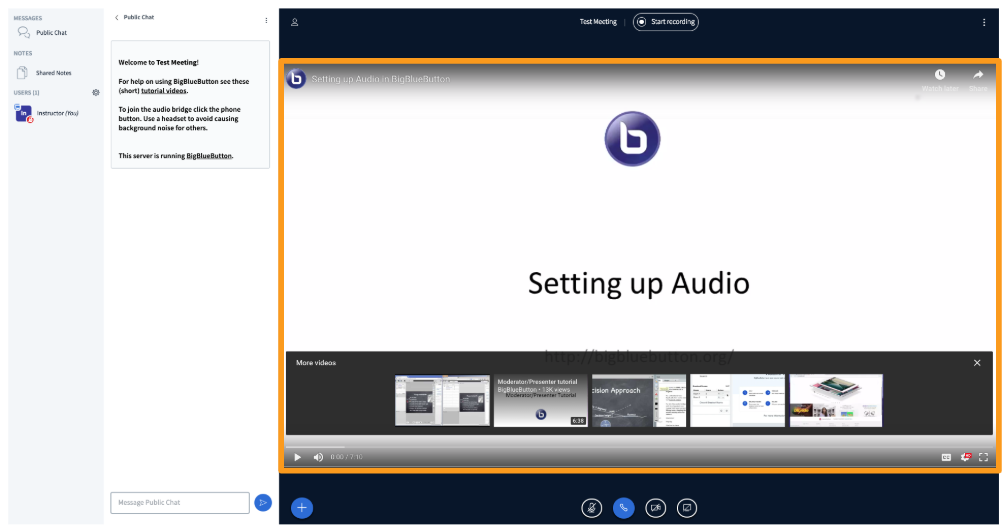
The video playback will appear to all users of the session in the presentation area of the BigBlueButton interface; you can pause and skip through the playback.
It is important to note that some mobile device browsers have auto playback of media turned off and the user will have to select play to engage the video playback.
Audio from the video will play on each users' local system - no need to share an open audio source!
To stop sharing
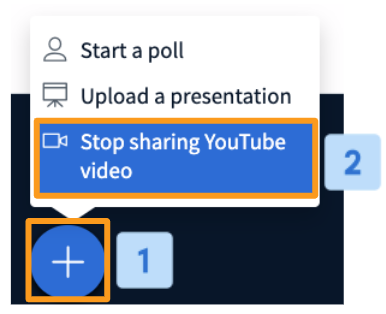
Select the Actions menu [1] in the lower left hand corner of the presentation window, then choose Stop sharing video [2].
The previously displayed content will display in the presentation area.
Share my screen
A presenter in BigBlueButton can use screen sharing to display content from their local desktop/laptop or chromebook in Chrome and Firefox browsers.
Screen sharing is currently not supported on mobile devices. To share a screen the presenter must use a desktop, laptop, or chromebook.
Use screen sharing to show viewers dynamic content or content that cannot be uploaded into the BigBlueButton as a static PDF; you can share your entire screen or an application window from your local desktop or laptop device.
If the session is being recorded, screen sharing is included in the recording and will be viewable in the playback.
Safari, Internet Explorer, and Edge browsers currently do not support WebRTC enabled screen share.
By default, the first Moderator to enter the BigBlueButton session is allocated the presenter role capabilities; if you are a viewer you will need to request presenter status from the moderator.
To share your screen
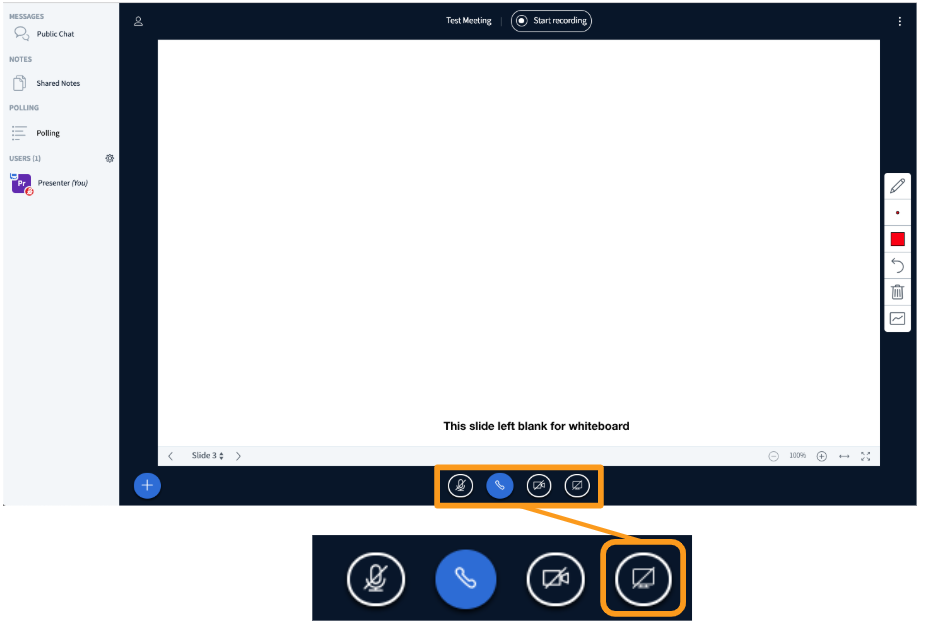
Select the Screen Share icon found in the media bar of the BigBlueButton interface.
What Users See
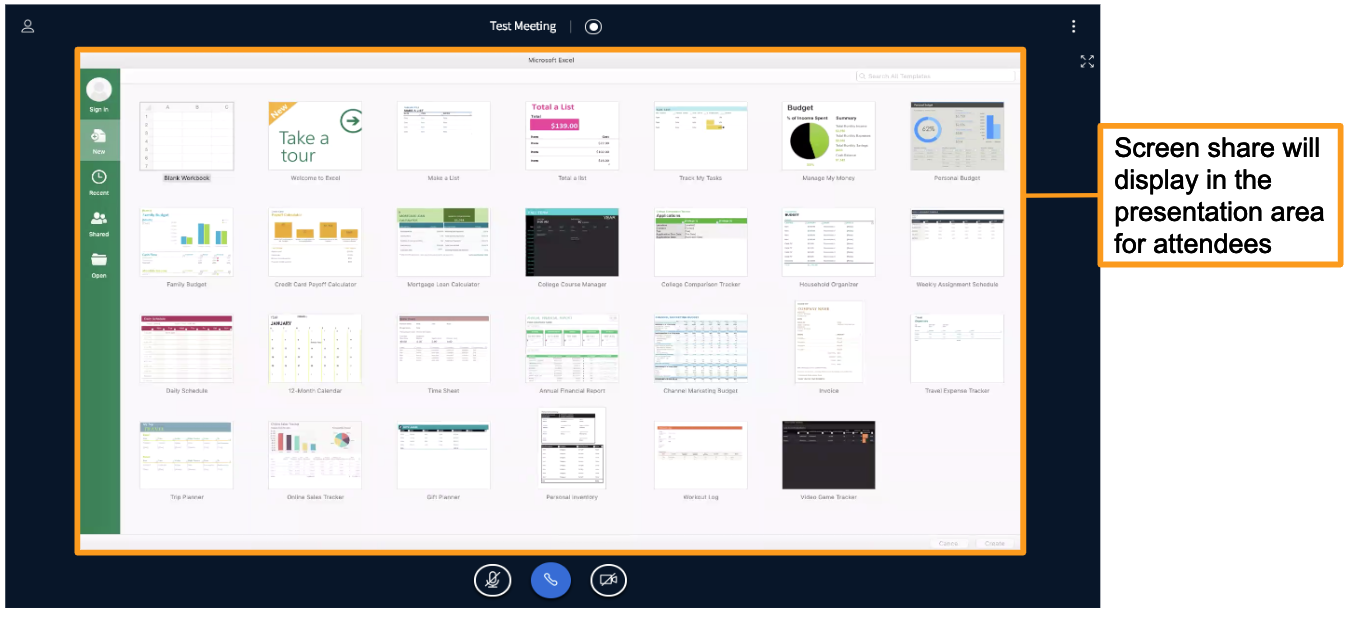
Users will see the screen share displayed in the presentation area of the BigBlueButton interface. It no longer loads into a separate window.
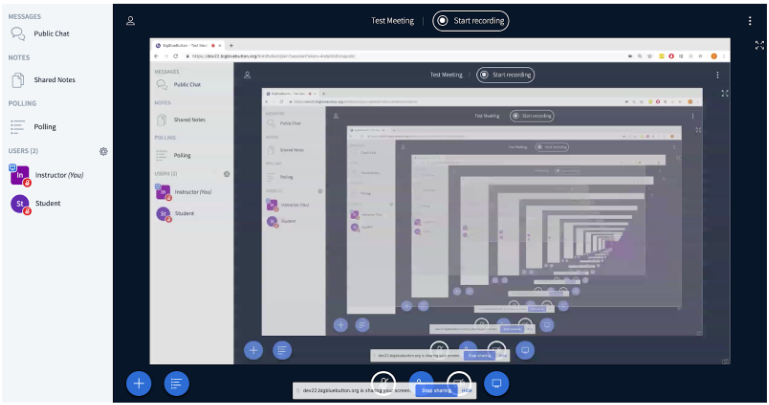
When the presenter is in BigBlueButton, screen sharing will duplicate to create a mirrored broadcast of the screen - DON’T WORRY as this is not what viewers see when in another tab or an application window.
Use Polling
Presenters in BigBlueButton are able to initiate polls throughout the live session; users can reply when prompted and contribute to the poll.
As a presenter you can use polling to engage students, perform test/exam reviews or pop quizzes, or use polling informally to collect information about your users.
- To start a poll
- Polling verbally
- Using a custom poll
- Using smart slides
Starting a Poll
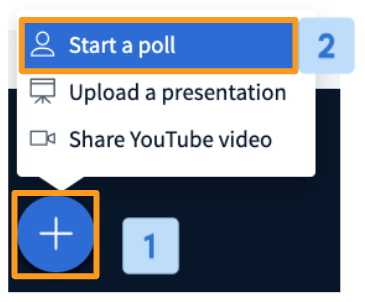
Select the Actions menu [1] in the lower left hand corner of the presentation window, then Start a poll [2].
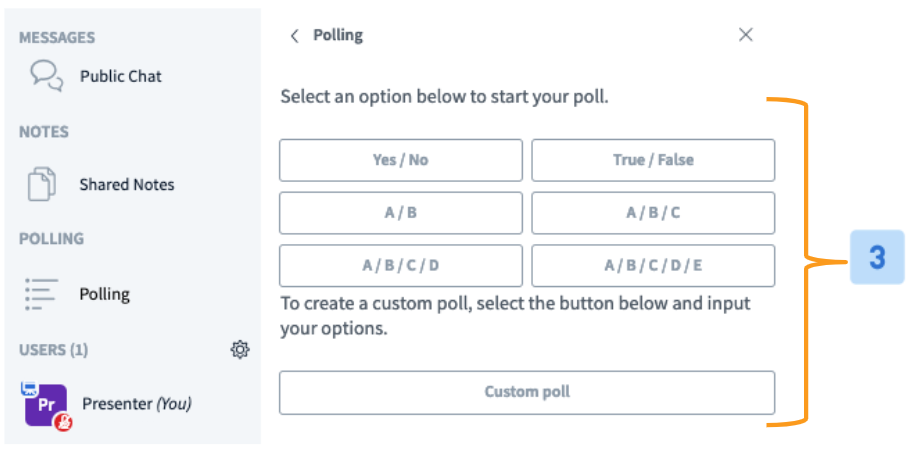
The polling menu will open with several options. Use the Quick or Custom Poll [5] options to initiate a poll.
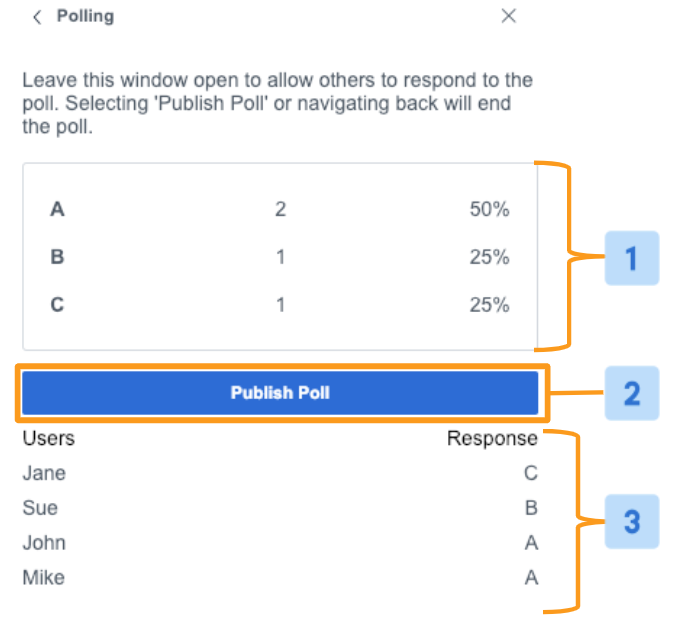
BigBlueButton displays the polling results in two ways: Anonymized results [1] and Individual user responses [3].
The anonymized results can be Published [2] to the presentation area.
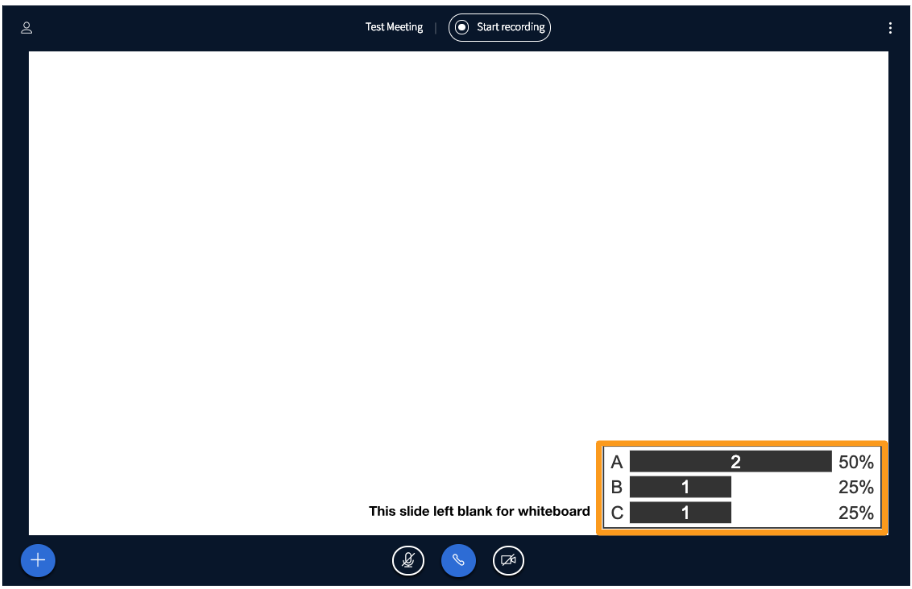
Once published, response options will no longer be available to users. Results will publish to the bottom right hand corner of the screen; published results appear as annotations and will be viewable in the recording playback.
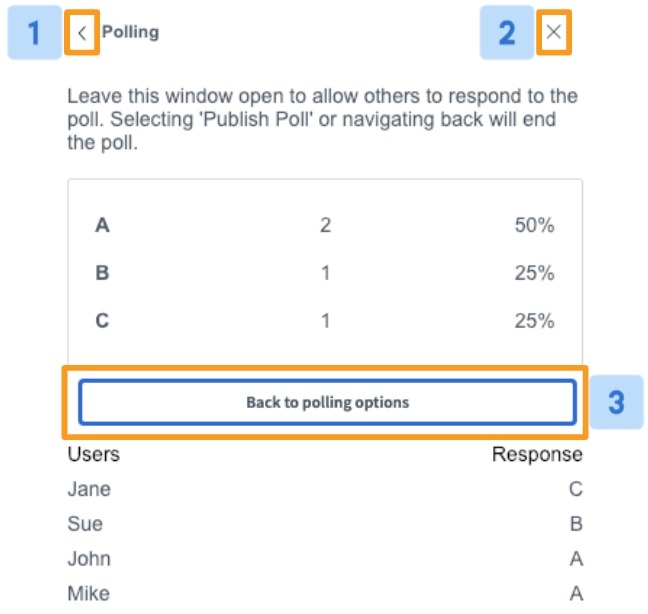
Select "<" [1] to minimize the polling menu or "X" [2] to close.
To continue with another poll select Back to polling options [3] .
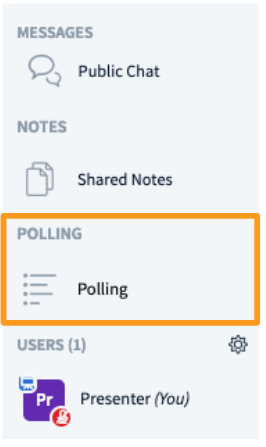
When minimized, the polling menu will appear under messages and above the users list. Select to reopen/continue polling.
Quick Polling
The most basic form of polling is a Quick Poll where the presenter asks the intended polling question verbally.
Quick polls are a great way to obtain "Yes/no" information or pose questions on the fly during the live session.
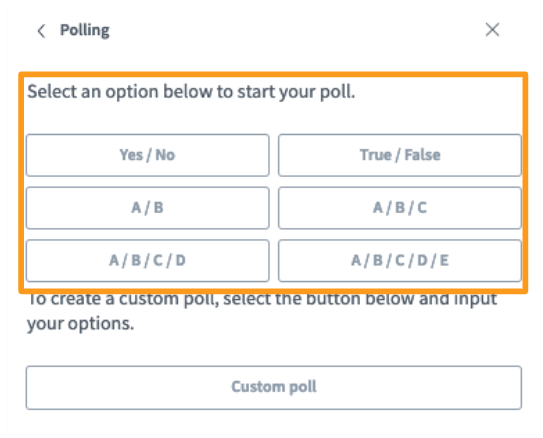
Once the question has been asked you can then select the appropriate response from the list of quick polling options.
Custom Polling
A presenter has the option of creating a custom poll while in a live session to input specific polling options that are not listed in the quick polling list.
The presenter would still ask the intended polling question verbally.
Custom polling is a great way to ask more specific questions or provide more tailored response options.
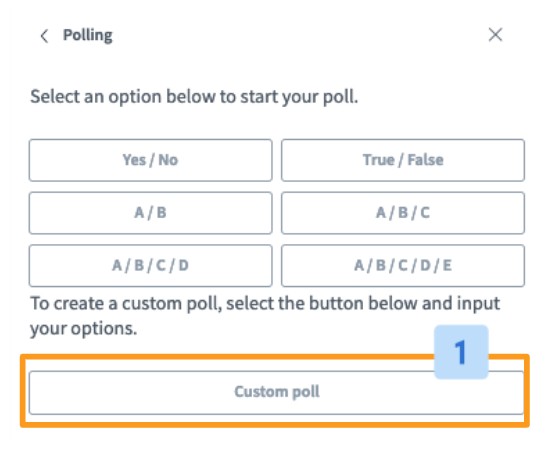
Select the Custom Poll [1] option from the polling menu.
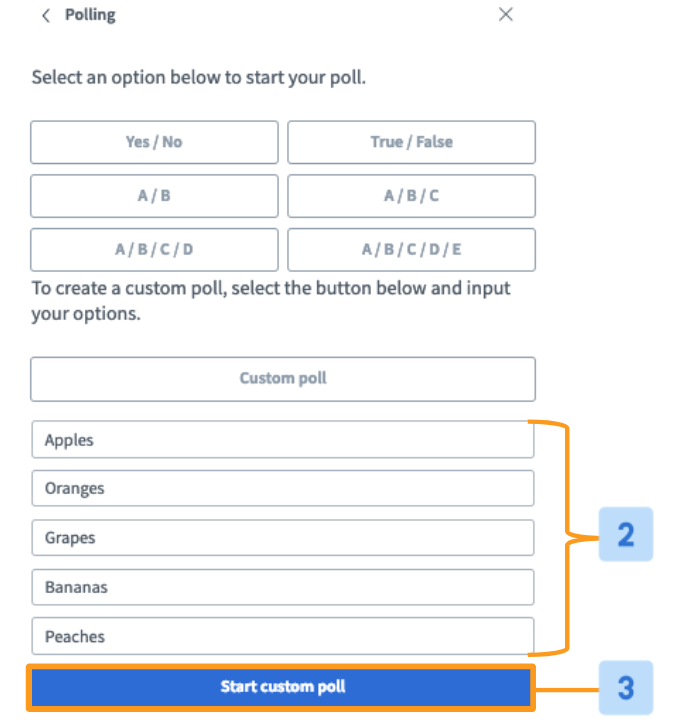
Enter up to five custom response options into the Input Fields [2], then select Start Custom Poll [3] to initiate.
Smart Slides
Smart slides enable a presenter to prepare a polling slide deck in advance or include polling questions in their regular content.
With smart slides, BigBlueButton detects when a question is being posed and provides a quick polling option to the presenter.
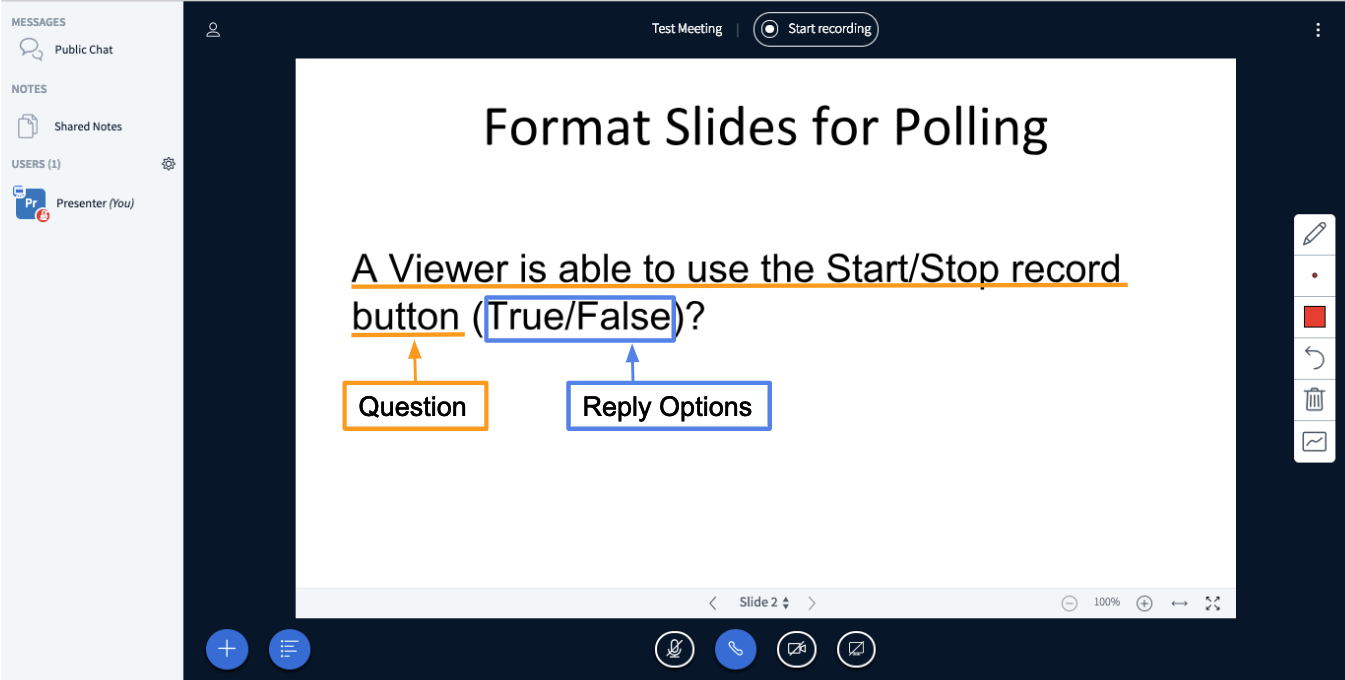
To create smart slides, ensure you are using the the format: "question" followed by "reply options". We recommend using the following reply options for best results:
- True/False
- Yes/No
- Multiple Choice (a/b/c/d)
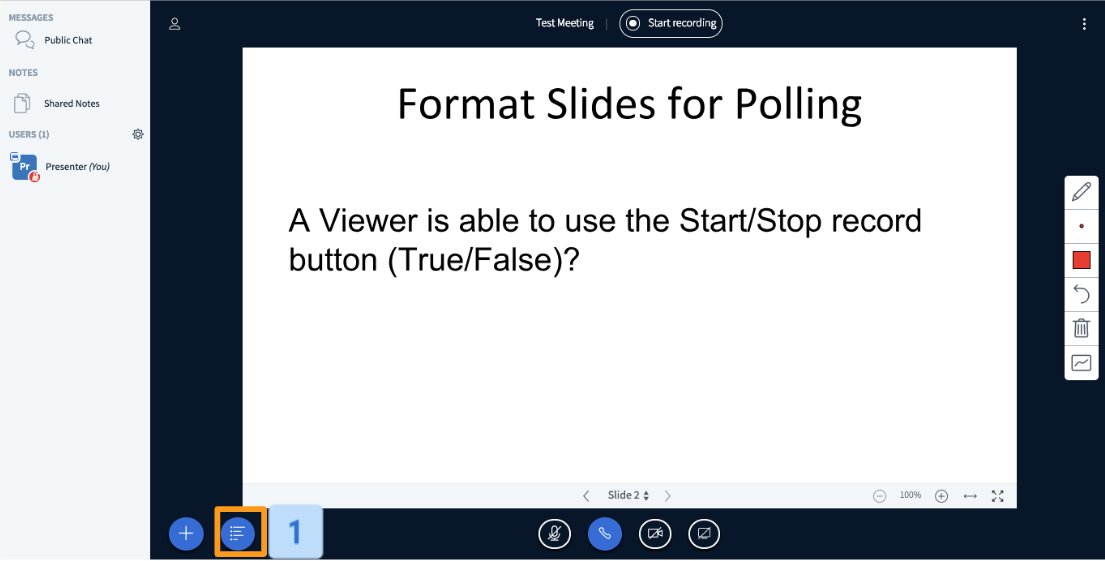
When questions and reply options are displayed, the BigBlueButton detects the intended poll and provides the presenter with a Quick Polling button [1].
Select the quick polling button to initiate the poll without navigating through the action menu or using the polling menu.
Contact Us
If you have any questions about this user guide, please contact us:
By phone: +977 9851226367 By email: mail@avyaas.com
